Home » Posts tagged 'kitchen remodeling'
Tag Archives: kitchen remodeling
Cabinet Painting Is a Challenge That Requires the Right Skill Set and Years of Practice
Cabinet Painting Sacramento is a challenging task that requires the right skill set and years of practice. Professional painters use a process that ensures flawless results that add value to a home.
It’s important to create a numbering system for each door, drawer front, and hinge before disassembling them. This will help you know where to reinstall each piece after they’re painted.
Cabinet painting is a big job and isn’t easy to get right. It takes a lot of time to properly prep the surface for paint and make sure everything is even. It also requires multiple coats of paint and drying time in between. Often, people do this themselves to save money, but it’s a project that’s not easily done without experience or training. Almost all of the calls I receive from homeowners asking for help after they’ve attempted to do the work themselves are because something went wrong.
The first thing that needs to be done is a thorough cleaning. This can be accomplished by using a degreaser like Krud Kutter or TSP to cut through the grime and grease that naturally builds up over time. This is important because the products used to paint cabinets need a smooth and clean surface to adhere to.
Next, the cabinet surfaces need to be sanded down. Start with a coarse-grit sandpaper, and then move to a finer grit once the surfaces are nice and smooth. When you’re finished sanding, use a tack cloth to remove any remaining dust from the surfaces of your cabinet.
Once the surfaces are ready, it’s time to prime. Primer helps to seal the cabinets and provide a solid surface for the topcoat. It’s also an excellent opportunity to cover any stains or other imperfections in the wood. I recommend choosing a high-quality primer that’s compatible with your cabinet material, and apply it according to the manufacturer’s instructions.
While the primer is drying, you can begin working on the final coats of paint. Again, it’s best to do this over several days. This gives the paint time to dry between applications and ensures a consistent finish. I always recommend using a high-quality satin or semi-gloss enamel paint for cabinet surfaces because it’s more durable and resists moisture better than other types of paint. You can apply the paint by brush or roller, but spraying is typically faster and more precise. If you decide to spray, be sure to mask off any areas where the cabinets don’t need to be painted (like counters or appliances). Also be sure to wear a respirator and eye protection.
Primer
When it comes to Cabinet Painting, a good primer is just as important as the paint. Primer provides a suitable surface for the paint to stick to and covers imperfections such as dings and scratches. It also blocks stains and seals the cabinets before applying the new coat of paint. There are many different types of primers, so choose the one that fits your project best. Some primers dry hard and prevent stains from bleeding through the paint, while others are water-based and allow for easy cleanup.
Kitchen cabinets are prone to moisture, which is why it’s important to use a primer that resists mildew. This will keep the cabinets looking their best and ensure that the paint won’t chip or peel over time. A good choice is KILZ 3-IN-1 Primer, which not only resists chipping and peeling but also contains a mildew-resistant coating for moisture-prone areas like the kitchen.
Using a good quality primer is especially important if you’re repainting old cabinets that were originally stained rather than painted. Without a good primer, the stain may bleed through the paint and ruin your efforts to get that fresh new look.
If you’re starting with brand-new cabinets, you can skip the primer and proceed directly to the paint. However, if you’re painting over a darker color or existing stain, it’s a good idea to use a high-quality oil-based or shellac primer. This type of primer adheres well to glossy surfaces and blocks stains better than other types of primer.
It’s also important to sand down the cabinet doors and drawer fronts before priming them. You don’t want to sand them too much, but you do need to rough up the smooth or shiny surface so the primer will stick. This will give the final cabinet painting a more professional finish. After sanding, wipe off any access dust and wait for the primer to dry completely.
Paint
Choosing the right cabinet paint is crucial for a successful project. Professional painters use specialized tools and techniques to achieve precise results that will last longer than DIY jobs. A high-quality primer is also essential for ensuring proper adhesion and a long-lasting finish.
Traditionally, oil-based enamel paints were used for cabinets due to their durability and fast drying times. However, these types of paints require extensive preparation and can yellow over time if not properly maintained. Water-based latex alternatives are now available for those who wish to avoid the extra steps required with oil-based products. They offer a faster drying time and are safer for the environment than traditional oil paints.
The best cabinet paint is durable, easy to clean and offers a beautiful sheen. This type of finish is ideal for busy kitchens where spills and splatters are common. Cabinet painting professionals typically opt for semi-gloss enamel paints because they are more durable than matte finishes and offer an attractive sheen without being overly reflective.
When applying the top coat, a high-quality brush is important to help avoid visible brush strokes. A square brush is often preferred because it allows for more precision when painting the recessed or detailed areas of a cabinet door.
Once the top coat has dried, a final light sanding is done to ensure an even surface. A fine grit sandpaper should be used to remove any remaining glossy spots before the final application of paint. Lastly, a final wipe down with a damp cloth should be done to remove any dust or dirt.
While some DIYers may prefer to use a spray painter for their cabinet projects, this method is generally discouraged by professionals. This technique can lead to less precise coverage over complex panel designs and could cause overspray onto surrounding surfaces if proper masking techniques aren’t employed.
Painting cabinets is a complex task and requires the right skillset and years of practice to execute correctly. While you can find plenty of tutorials and inspiring photos on Pinterest, those do not always show 2-year follow ups or close-ups of how the work actually looks in real life. If you are looking to raise the value of your home, hiring a pro for cabinet painting is highly recommended.
Finish
When done properly, painted cabinets can add significant value to your home. However, it’s a project that requires specialized training and years of practice to get right. Most DIY homeowners don’t have the time or experience to achieve a quality finish. Worst case, they can create an enormous mess and end up with a disastrous result.
Before starting the actual painting process, it’s important to lightly sand the surfaces of the cabinet doors and drawer fronts to eliminate imperfections. This will also help the paint adhere to the surface. After sanding, it is also essential to clean the cabinets thoroughly. This will remove grease and grime, which can cause the new coat of paint to crack or chip over time.
After a thorough cleaning, the surfaces should be wiped down with a damp cloth to remove any remaining dust and sanding residue. A few layers of primer are usually needed if the cabinet color is significantly different than the original surface. This will create a base layer that will prevent the new paint from cracking or chipping.
The best finish for kitchen cabinets is semi-gloss, as it is highly durable and resists moisture damage. It is also easy to clean, which makes it ideal for homes with children and pets. Another option is satin, which is a soft and luxurious finish that looks beautiful in most kitchens. However, it isn’t as durable as a semi-gloss and can easily lose its luster if exposed to water.
Once the cabinet finishes have dried, you can reattach the cabinet hardware. It’s important to label the hardware bags and mark where each piece goes so it is easier for you or the professional you hire to reinstall them later. It’s also a good idea to cover any countertops or appliances in plastic to protect them from paint and dust.
A clear sealer can be applied to the cabinets after they have dried, which will protect the finish and keep it looking nice for years to come. The sealer should be a polycrylic or polyurethane product that is designed to be used on painted surfaces and should not contain oil, which can cause the finish to yellow over time.
How Long Does a Bathroom Remodel Take?
Remodeling your bathroom is a chance to make it more functional and appealing. You can upgrade to energy-efficient models that reduce utility costs, or add features like walk-in showers and kid-friendly tubs.
However, it’s important to understand what factors can sway renovation prices. From geography to unforeseen repairs, these considerations can impact your budget. Click Here to learn more.
When you’re getting ready to start your bathroom remodel, one of the first questions that arises is how long will the project take? Ultimately, the length of your remodel will depend on a variety of factors, including the scope of work and the amount of time it takes to complete each phase. Fortunately, proper planning and communication can help to reduce the duration of your renovation.
During this phase, you’ll be able to work with a designer or design-build firm to create a plan for your remodel that includes your vision for the space. It’s important to clarify your goals for the bathroom, both in terms of aesthetics and functionality. This will ensure that the finished product meets your needs and fits seamlessly into the home.
Once the plan is set, you’ll be able to determine a rough budget for your project. This will include the cost of materials, labor, and permits. It’s also important to reserve a certain percentage of the total budget for unforeseen expenses, which can often occur during a renovation.
In this stage, you’ll also explore different design options for the bathroom to find a look and feel that appeals to you. You can use inspiration from design magazines or websites to find a style that suits your taste and matches the architecture of your home. In addition, you’ll want to consider how the materials used in your bathroom will hold up to wear and tear over time. Choosing durable, easy-to-clean materials will make the bathroom easier to maintain in the future.
As part of the design process, you’ll also have to choose which fixtures and finishes will be installed in your new bathroom. This will include items like toilets, tubs, showerheads, sinks, and cabinets. You’ll be able to get an idea of the cost for these items during the exploratory phase, but the final decision will come down to your budget and preferences.
In this phase, you’ll also have the opportunity to add a few accent pieces and decorative elements to give your bathroom a personalized touch. This is a great time to test out color palettes, lighting, and furniture to see how they fit in the space.
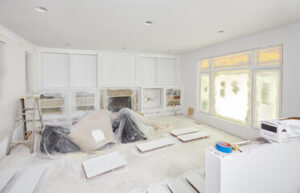
The Demolition Phase
When it comes to bathroom remodels, the demolition phase is where old elements are removed and the room is prepped for renovation. This can include anything from taking out a toilet to tearing up flooring and tiles. It’s important to take safety seriously during this part of the process. Wearing protective gear like goggles, gloves, and masks is a must. Additionally, it’s a good idea to turn off water and electricity before starting work. Finally, it’s a good idea to rent a dumpster for the debris from the demo process, which will save you the hassle of making multiple trips to the dump.
Depending on the scope of your project, the demolition phase can be relatively quick or take longer than expected. For example, if your bathroom has a lot of drywall, it may take a while to remove and replace the material. Also, if you have a complicated plumbing layout, it can take time to detach and disconnect pipes, as well as reroute the lines. Lastly, it’s often necessary to tear up the floor and subfloor to identify and address any issues, such as rot or water damage.
Once the demolition is complete, framing will begin. This includes constructing walls as well as adding structural support in order to accommodate new fixtures and features, such as shower stalls or tubs. It’s important to ensure that the framing complies with local codes in order to keep your family safe.
This phase can be lengthy and expensive, especially if the bathroom is being completely overhauled. However, the end result is worth the effort in terms of increased home value and quality of life.
Keep in mind that the budget for a homeowner bathroom remodel can be impacted by numerous factors, from the geographic location to the cost of permits. It’s essential to understand these underlying costs in order to stay on track with your remodel plan and avoid surprises down the road. Fortunately, you can mitigate many of these expenses by planning ahead, choosing materials that align with your design vision, and ordering materials early to account for delivery schedules and to avoid project delays.
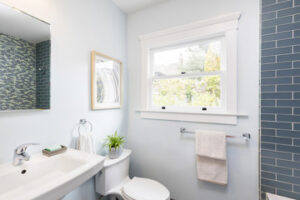
The Installation Phase
Once the plumbing has been replaced and the framing is completed, the contractor can begin installing your new bathroom. This includes vanity cabinets, toilets, showers and tubs. It also includes any other fixtures or accessories that you have selected. This phase typically takes 2-4 weeks to complete.
This is where your vision for your dream bathroom begins to take shape. Your contractor can help you choose tile patterns and colors to create a cohesive design. It is important to balance your style preferences with practical considerations like material costs and water usage.
During this stage, it is common to knock down non-load-bearing walls to create an open floor plan or reconfigure the layout for improved functionality. It is important to reinforce or replace load-bearing walls as needed to maintain the structural integrity of your home. Your remodeling professional will be able to help you understand the implications of these changes for your budget and timeline.
When it comes to tiling, it is important to consider the durability and safety of your chosen materials. Porcelain and ceramic tiles are popular choices because of their durability and water resistance. Textured options are available for added slip resistance in wet areas. Consider incorporating heated flooring for a luxurious touch or to prevent cold feet in the morning.
The installation phase also includes finishing touches, like putting in mirrors and light fixtures, and installing cabinet hardware. It is also a good time to add custom closets and install specialty finishes, like wainscoting or wallcovering. Adding these final touches can add up to a significant amount of your overall remodel cost.
As you approach the completion of your bathroom remodel, it is a good idea to do one last walk-through with your contractor. This will give you a chance to catch any lingering issues and make sure that everything meets your standards before the project is complete.
Whether you are looking to update your current bathroom or are planning for future needs, there are many benefits to renovating your home’s most used space. From enhancing your quality of life to increasing your property value, these improvements can add up quickly. With careful planning and a dedicated team of professionals, you can ensure that your bathroom remodel is completed on time and within budget.
The Finishing Phase
During this phase, the design plans transition from paper to reality and the bathroom starts taking shape. The installation phase is a time of precision and craftsmanship, ensuring that every fixture is set up correctly and aligns with the homeowner’s vision. Depending on the scope of work, this phase can take anywhere from 3 to 6 weeks.
Once construction begins, it’s important to keep a close eye on your budget. Unexpected expenses can arise at any time, so it’s a good idea to set aside 5-10% of your budget for contingencies. This will help you stay on track and avoid any major hiccups during the project.
This is also the ideal time to make any changes or upgrades that you have been dreaming about. A little bit of creativity goes a long way in making your bathroom remodel a complete success. For example, if you want to change out your sink and toilet for something more modern, now is the time to do it.
It is also a great idea to save all of your concept images and notes in one place, either on your computer or in the cloud. This will allow you to easily reference them when making design decisions. This will help you stay on track and create a space that is truly your own.
While you may have a solid idea of the look and feel of your new bathroom, it’s always a good idea to meet with an experienced designer. This will give you the opportunity to discuss all of your goals and ideas with an expert who can offer creative solutions. They can also help you solve any design flaws that you may have and ensure that the final result is a cohesive and beautiful space.
Permits are required for a variety of reasons, including structural changes and extensive plumbing or electrical updates. They are also essential for ensuring that the remodeling work follows local code regulations and safety standards. Ultimately, working without a permit can lead to serious legal and financial consequences down the road.
The cost of a bathroom remodel can vary greatly depending on several factors, from the location to unforeseen repairs. However, if you have a clear vision of what you want your finished space to look like and plan ahead for the unexpected costs, you can still end up with a beautiful, functional bathroom that will last a lifetime.